Metadata access properties
In the previous section, we proceeded to register the metadata. However, we didn't include any information about it. It's time to add the first important piece of information: the SQL Server database connection properties. In Manager / Scheme we have created the metadata called Course Metadata.
Now we need to associate this metadata with the SQL Server database created via Management Studio. Check the status of this database at the moment. Open Management Studio and look at the database, logging in with the sa user. Realise that the database is empty, with no tables.
The next step is to link the metadata registered in the product to this database. Although the name of the schema and the database don't have to be the same, it's sometimes practical to keep them identical to make them easier to identify in SQL Server.
- In PIS, select the Manager / Login option on the toolbar.
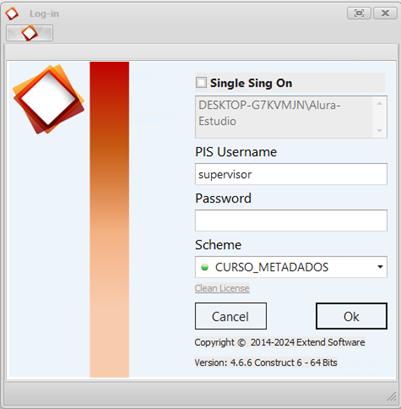
- The login screen appears. Note that below is the metadata registered as an option in Scheme. If there is more than one metadata registered on this server, all the options will be listed.
- Enter the user name in Username and the password in Password. This user will have the supervisor privilege. Any username and password can be entered at this point. It is with this data that the supervisor user will be registered for the first time in the metadata. You can use any username. However, it is recommended that you name the user supervisor.
- After clicking OK, a message will appear indicating connection problems with the metadata and the metadata database, asking if you want to enter the connection properties. This message can also appear if, when logging in to the tool, the metadata database is unavailable. In this case, the message appears because no connection property relating to this metadata has yet been registered.
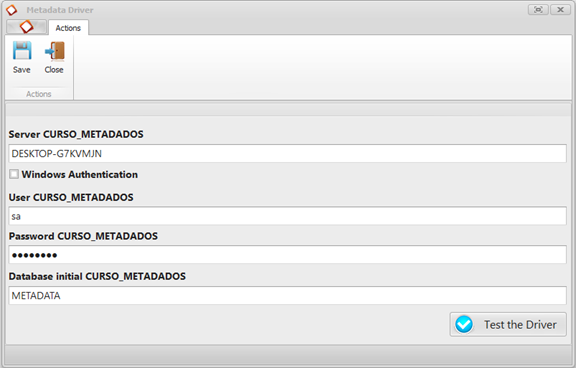
- After confirming that the connection properties have been created, we proceed to enter the server name. Use Management Studio to obtain this information.
- The user used for the connection will be sa, and the password will be the same as the one created during the SQL Server installation. Although it is not compulsory to use the SQL Server administrator user, the user chosen must have administrative privileges over the database.
- Include the name of the database you created.
- Finally, click on the Test the Driver button to test the connection.
- When you have successfully tested and confirmed the connection, save the connection properties by clicking Save, and finalise the configuration process for the integrator to access the metadata database by clicking Close.
Help: Log-In (4.6.6.6)
Manager / Login

Single Sing On: By checking this option, the connection will be made using the user logged in to the operating system.
Username: User name.
Password: User password.
Scheme: Metadata that the connection will be made.
Cancel: Cancels access.
OK: Confirm access.
Help: Metadata Driver (4.6.6.6)
Manager / Edit Metadata

Server: Name of the server where the Metadata database is located.
Windows Authentication: If selected, access to the Metadata database will be done using Windows user authentication.
Username: Metadata database server user.
Password: Database user password.
Database: Name of the database.
Test the Driver: Tests access to the database.
Save: Confirms the recording of data relating to the connection in the Metadata database on the server.
Close: Closes the dialog box.