Finishing the first access
We will now proceed with completing the first access. We will register the supervisor user, configure the server working directories and register the license. It is important to remember that, as discussed in the previous section, the metadata connection properties in SQL Server were properly registered.
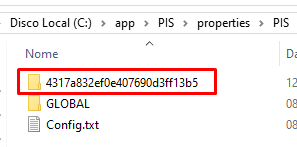
If you go to the Properties directory of your installation you will see a prefix referring to your product (In this case it would be PIS) and below another subdirectory whose name is the Metadata identifier.

Within this subdirectory, you will find the connection information with the metadata. In the previous section, what happened was that, when we performed the first login, the system was unable to locate the metadata record and its respective connection properties, making it necessary to enter this information.
The properties directory is located on the server side. It is crucial to remember that the current configuration involves an installation on a single machine, which acts simultaneously as server and client. However, in a production environment, this accessibility is restricted, so the client does not have the ability to access the server or this specific directory. During the process of registering new Metadata properties, additional subdirectories essential for the tool's operation will be created.
Therefore, return to the login screen. Try connecting again. When doing this, the product will find the connection access to the database and verify that it is empty (No tables). At this point the Metadata tables will be created. However, we need to register the supervisor user whose login and password you initialized on the login screen. That's why this dialog box below:

Click Yes. If you go to the database you will see that it now has several tables. Among them is a table called USR. If you look at its content you will see that two users were created: The supervisor user with the connection data (Login and password) initialized on the login screen and another user called power which is used by the support team whenever necessary.
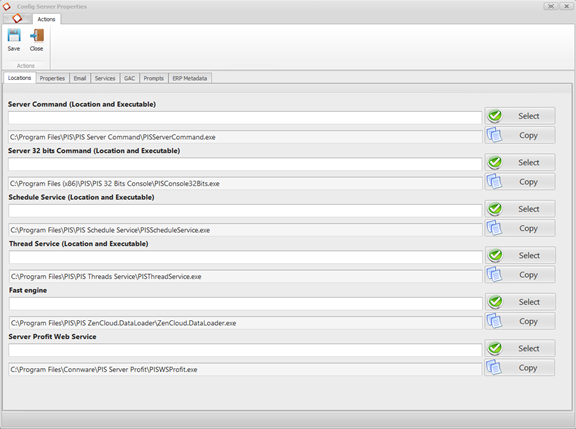
When you return to the login screen, try logging in again. Internally, the product will once again access the metadata, see that there are tables, see that the supervisor user was created and present another necessary configuration, which is the server settings (Server Config).

The server settings dialog has a number of properties. As we evolve in our knowledge of the product, these properties will be reviewed.
However, at this point, we need to determine the location of some product modules. These are the five presented on the screen. Proceed as follows:
- Click all the Copy buttons located on the right part of the dialog box.
- Change to the name of the directory where the product was installed. In this example, it would be replacing C:\program files with C:\app. Replace with the directory you chose to install the product.
- Click Save.
- Click Close to close the dialog box.
The directories configured in this dialog box reference operating system services created by the product for managing process scheduling, thread management, thread execution. And data load acceleration engine.
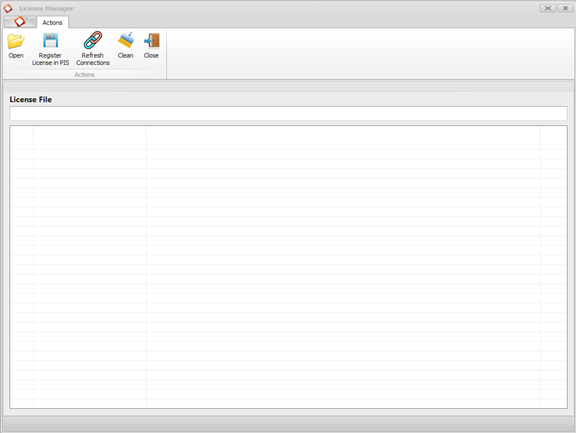
Try logging in again. All previous tests will be repeated until the product finds the license registered. That's why you'll see this dialog box below:

Click Open to choose the file with the KLC extension provided with the installers. Although the received file may have a different name, the crucial thing is that it has the KLC extension.
After selecting the file and opening it, several parameters related to product licensing are presented, including different types of licenses. In this example, a trial license is used, which has an expiration date. This validity may be defined in the KLC file itself or determined by checking with the product's centralized license servers on the internet.
There are two main categories of licenses: On Premises and Internet license. Within these categories, it is possible to have evaluation or definitive licenses. Permanent licenses are linked to the registration of the hardware on which the product is installed, a process generally carried out when implementing the product in a customer's production environment. However, for educational and learning purposes, the trial license is perfectly fine, not restricting the functionality of the tool.
However, the license may limit the use of the tool in certain aspects, such as access to certain drivers or the number of simultaneous connections allowed. It is possible, for example, to restrict the number of administrators, designers and operators users, among other settings specified in the license. The license provided will allow full use of the tool, making it easier to learn its various functionalities.
After loading the KLC file and registering the license, a new attempt is made to connect to the product.
Upon establishing the connection, the user is taken directly to the integrator's home screen. No other dialog box was presented as all configuration has already been done.
Repeat connection:
- Click on Manager / LogOff.
- Then click on Manager / Login
- Enter your supervisor username and password.
- Note that you now access the product directly without any further configuration dialogs being presented.
From the properties directory we already have all the initial configurations necessary for the product to work. It is important to note that changes to the name of this directory, or the exclusion of any of these subdirectories, may compromise the correct functioning of the integrator.
With the product properly installed and configured, it is possible to begin learning and exploring the integrator.